How to Make an Easy Tie Dye Shirt
Learn how to tie dye. Tie dying was a popular fabric trend in the '60s, a symbol of free expression and the happy, hippie era. The tie dying technique makes a comeback every so often and it never loses its symbolic free-spirited, individuality through tie dye's unique designs. Today you'll see tie dye worn by celebrities proving it is never really out of style. Continue reading to learn how to tie dye step by step with this easy tie dying for beginners guide.

Contents
- How to Tie Dye Step By Step
- Easy Tie Dying for Beginners - Supplies
- What is the Best Dye to Use for Tie Dye
- Amazon Tie Dye Kits
- How to Tie Dye - VIDEO
- How to Tie Dye Step by Step - Instructions
- Step 1 - Preparation (Mix Dye & Wash Fabric)
- Step 2 - Tie the Fabric
- Step 3 - Immerse in Dye
- Step 4 - Rinse
- Step 5 - Optional: Repeat for New Colors
- Step 6 - Remove Bands, Wash & Dry
- How to Tie Dye - With Patterns
- Easy Tie Dying with Scrunching
- How to Tie Dye Small Circles
- How to Tie Dye Fan-tastic Stripes
- How to Tie Dye Mirror Images
- How to Tie Dye a Rainbow Spiral Shape
- How to Tie Dye Hearts
- How to Tie Dye - Upcycle Ideas
- How to Wash a Tie Dye Shirt and Stop it Fading
- How to Tie Dye - Frequently Asked Questions
- How to Tie Dye - In Conclusion
- More Fabric Techniques
- More Tie Dye Articles
- How to Tie Dye - Easy Tie Dye Instructions
- Tools
- Materials
- Instructions
- Notes
How to Tie Dye Step By Step
Learning how to tie dying is a little messy, but really fun and something the whole family may enjoy. The end result is never right or wrong. The process, once you have the right materials, is not difficult at all. It involves tying up different parts of the fabric so the dye penetrates unevenly giving a multitude of different effects according to the tying process used. You can combine tie-dye with fabric paint and other mediums to create one-of-a-kind pieces for your wardrobe. Often when we think of tie dye we think of bright colors but you can use pastels, earthy tones, or anything that takes your fancy. Follow these simple directions to begin a tie dye project.

Easy Tie Dying for Beginners - Supplies
What do you need to learn how to tie dye step by step?
- WORKSPACE - Indoor or outdoor space to set up the dyes - be prepared for some spills and mess! Paper towels should be handy at all times!
- DYE - Commercial tie dye colors are best. For smaller quantities consider purchasing tie dye kits which have several colors in smaller quantities. Most kits come with applicator bottles filled with a powder dye that you just add water to.
- FABRIC - Fabric or a clothing item to dye. Must be 100% cotton, rayon or natural fibers such as silk for the best results. You can experiment with fabric blends, but do try them out first as they may not take the dye as well. Most dye packets will make enough color to do several articles so it is best to find a few articles to dye together. You could use the same colors but create different patterns on each article of clothing.
- BUCKETS - Buckets or plastic containers to hold enough dye to dip the articles. Plan on having one bucket for each color you decide to mix.
- WATER - Hose or sink to rinse items in cold water. Don't use plastic sinks as they may stain with the dye. Stainless steel sinks are best.
- STIRRERS - Wooden spoon or dowel rods to stir fabrics. It will stain from the dye so use something disposable.
- BANDS - Rubber bands or twine to tie the fabric. I prefer rubber bands as the dye does not penetrate it, leaving nice white bands in your final product.
- GLOVES - Rubber gloves to stop your hands from getting stained.
- MARBLES - Marbles are a great object to wrap into the fabric and tie.
- TOOLS - Scissors and metal tongs.

What is the Best Dye to Use for Tie Dye
One Step Dyes
When people ask this question they are usually looking for the easiest option. Dyes labeled one-step are usually the easiest as all you need to do is add water. Tulip is a great brand that creates vibrant one-step dyes specially designed to tie dye. You can buy these in kits of several colors and they come with applicator bottles to make your job even easier. I also found a tie-dye kit at Kmart for just $9. It just had 3 colors but it was a great starter kit.
Amazon Tie Dye Kits
Other Dyes
There are several other brands that make dyes suitable for tie-dye but you may have to perform an additional step where you wash your fabric in soda-ash before dying. Since you have to pre-wash your fabric anyway, this isn't really that much of a hassle. All-purpose fabric dyes can certainly be used for tie-dye but you will find that you end up with paler colors that don't last as long.
How to Tie Dye - VIDEO
Check out the Youtube video I made on easy tie dying for beginners! It really is easy to tie dye.
How to Tie Dye Step by Step - Instructions
To summarize the steps of how to tie dye:
- Prepare your workspace, dye and fabric
- Tie the fabric in knots
- Immerse in dye
- Rinse the dye from the fabric
- Repeat for new colors
- Dry
Step 1 - Preparation (Mix Dye & Wash Fabric)
- WORKSPACE - Get the area you have chosen ready for a messy event. Cover tables with plastic and if you feel it is necessary, the floor as well. Working outside gives you more freedom especially if you decide to make this a family affair.
- MIX DYE - Prepare the dye mixture according to the instructions on the packet. One-step dyes such as Tulip brand usually just need water added to the applicator bottles. If you are using larger dye packets you can use one of your buckets or containers to mix and contain the dye.
- WET or WASH - Prepare your fabric. All new clothing items should be prewashed in case they have starch or chemicals that may prevent the dye from penetrating. Using fabrics or garments you plan to upcycle will not require pre-washing but should simply be wet.
Most dyes work best if your fabric is wet already. The fabric should be wrung as much as possible so it is damp rather than sopping wet. Check the dye instruction leaflet to confirm.

Step 2 - Tie the Fabric
When your area is prepared you are ready to start to create a tie dye pattern. There are several methods and color combinations available. It is best to start simple and be happy with the outcome.
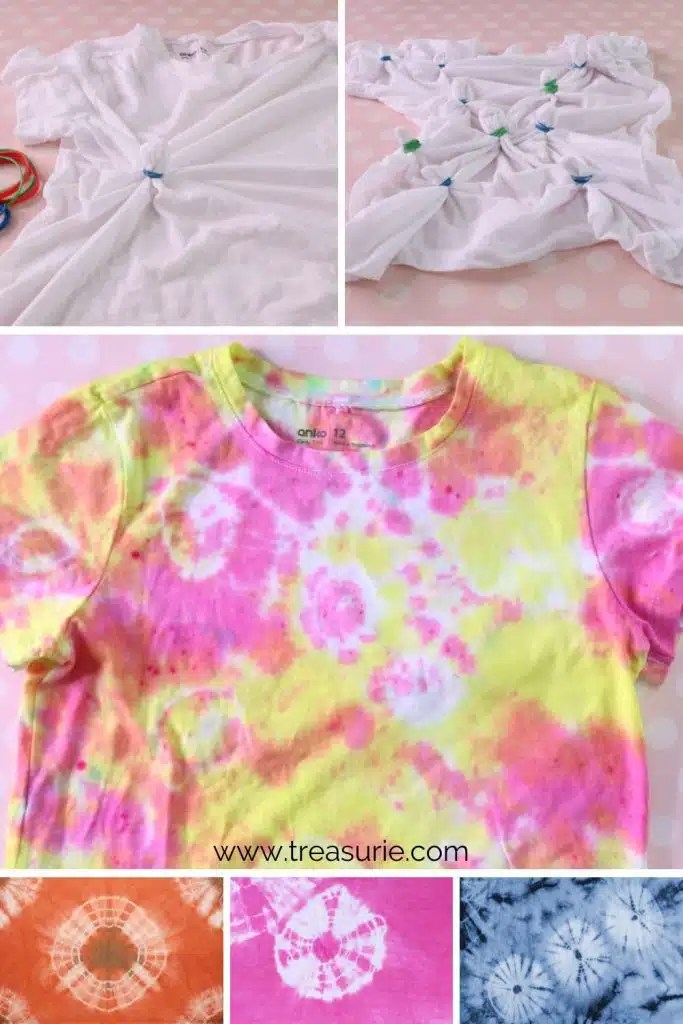
Choose a tying method. Rubber bands work well in most instances, otherwise tie with twine. The idea with tie-dye is the tied-up parts with bands or strings will not absorb the dye. This technique creates the patterns and swirls associated with tie dye. Rubbing some candle wax on the twine will make it extra resistant to the dye.
PATTERNS - See further down this article for different tying techniques you can use.

Step 3 - Immerse in Dye
Dyeing in a Bucket
- When you have tied the fabric, get ready to swirl it in the bucket of dye. Pick it up with the tongs to check the color. If you are not happy with the intensity of the color, continue to leave the fabric in the dye for longer. Check the instructions on the packet of dye for times and amounts of water.
- Finally, wrap the dyed fabric while wet into a plastic bag to allow the colors to set further. Check the instructions on the commercial dye for the time allocation for this.
Using an Applicator or Brush
- Greater control of where your color is applied can be obtained by putting dye in plastic applicator bottles and just squeezing dye where you need it. You could also put different colors in bowls and paint the dye where you want it. The excess dye can be quickly absorbed by paper towels.
- Use a cooking rack so the fabric doesn't sit in the excess dye that runs off. This will give you better color definition. I placed my rack on a large glass oven dish to catch the dye. This made cleaning up really easy.

- After using an applicator or brush, place the item in a plastic bag so the dye can penetrate.
- The time it sits in the bag will depend on the intensity you desire. Most one-step dyes reccommend 6-8 hours but you can leave it longer if you want even mor vibrant colors.

Step 4 - Rinse
When you are satisfied with the color, remove the item from the plastic bag and rinse in cold water. Keep going until the water runs clear.
Step 5 - Optional: Repeat for New Colors
If you plan on using different or overlapping colors repeat the dying process with other colors. Using different colors requires careful planning because colors change when they are dyed together. For example, if you dye yellow over blue you will get a green shirt. If you unwrap and re-tie the dyed fabric before dying the next color then the white parts take on the new color while the first color changes according to a color mixing chart.
Step 6 - Remove Bands, Wash & Dry
- Once the rinsing is done and the water is running clear, remove the rubber bands.

- Wash the dyed fabric items normally by hand or machine. There may still be small amounts of dye that come out so it is important that you wash the fabric separately.
- You can then hang it out to dry and give your fabric a good iron.

How to Tie Dye - With Patterns
There are many different ways to tie the fabric. You can create effects by either random tying or aiming for a more controlled look with some suggested patterns. There will never be two tie dyed patterns exactly the same which is part of its charm.
Easy Tie Dying with Scrunching
Just scrunch and crumple the fabric up into a ball and wrap the rubber bands around to tie up the folds in a random scrunched effect. The blue and pink in the photos below can be created by immersing in one color of dye. For a multicolor effect, use squeeze bottles to randomly put different colors on the fabric.

How to Tie Dye Small Circles
Use marbles or stones to create a small circular tie dye pattern. Push a marble under the fabric and fold the fabric over the marble. Twist the fabric slightly and then tie underneath with elastic bands or twine. Leave spaces in between each marble to allow the dye to penetrate the fabric. If you don't have marbles, you can get a similar effect by just pinching the fabric and applying a band. The main difference is that marbles give a more consistent size to your tie dye circles.
How to Tie Dye Fan-tastic Stripes
Fold the fabric like a fan or pleats. Make the folds as narrow or wide as you like. Then put rubber bands over the folds at different intervals. Tying twine will also give the tie dye effect and the tighter the twine is tied the less dye seeps into the folds and the more white or plain spaces are evident.

How to Tie Dye Mirror Images
Fold the fabric or the item of clothing in half and insert a marble to tie into a double layer of the fabric. Tie in exactly the same way, but the two pieces of the fabric will be together. Dye in the normal way and when you open up your fabric there should be two 'mirror' images on the fabric. In tie dye there will never be exactly two images the same, but there will be a definite similarity.

How to Tie Dye a Rainbow Spiral Shape
To create the rainbow spiral you need to use your wooden spoon handle or dowel stick to turn the fabric into a spiral.
- This technique works best with adult sized t-shirts. When testing I tried some kids shirts and they were harder to twist.
- Start by laying the fabric flat and placing the stick into the center of the fabric. Then twist the stick round and round to form a circle of fabric. It will look like a pie shape. You can also just pinch the center and then twist.
- When the circle is complete remove it gently from the table and put the elastic bands round to secure the spiral.
- Imagine your colors are going to be in thirds or quarters around the pie/circle of the spiral. Use yellow, turquoise, and red for your basic colors. Add other rainbow colors if you wish.
- Paint the dye on to be more controlled with your colors. Use a sponge applicator for easy painting of the dye.
- Rinse and open out to see your beautiful rainbow tie dye.

How to Tie Dye Hearts
First, draw a heart shape on your fabric. For perfectly symmetrical hearts fold the fabric in half. Using a large running stitch (up and down), stitch around the heart and then pull the stitches really tight so the heart gathers up. Put a rubber band on top of the stitching. A lot of tutorials just say to gather up the fabric in a heart shape but I think using the running stitch to gather it all up gives a more accurate shape. When your fabric is dry you can remove the stitching.

How to Tie Dye - Upcycle Ideas
Here are some suggestions of interesting items to 'upcycle' with Tie Dye:
- T-shirts, especially white ones.
- Scarves
- Headbands and hair scrunches
- Bags, fabric tote bags
- Caftans and beach wraps
- Aprons and oven gloves....in fact, anything you fancy needs a bit of zing and zest!
How to Wash a Tie Dye Shirt and Stop it Fading
When learning how to do tie dye, the important thing to remember with your tie dye articles is that they should be washed on their own. If you throw them in the washing machine with other colors or whites, then you will probably have some dye transfer and ruin some of your clothing. There are some things you can do however to minimize the amount of dye that comes out of your new tie dye shirt.
- Don't wash your shirt until the dye has been drying for at least 24 hours.
- For the first wash, use a bucket of warm water and add half a bottle of white vinegar. This helps stop the dye bleeding.
How to Tie Dye - Frequently Asked Questions
Should your shirt be wet or dry for tie dye?
Most fabric dyes take better if they are wet to start with as the dye can better and more evenly penetrate the fabric. It is however still possible to tie dye dry fabrics. The object of tie dying is not necessarily to get an even dye job!
How long should you leave the dye for tie dying?
This depends on your dye instructions but as a general rule, the longer you leave the dye on your fabric the stronger and longer-lasting the colors will be. Many dyes can be left for up to 24 hours.
What colors should I not mix when tie dying?
Keep in mind that when tie dying, colors will mix in the sections where they overlap. That means if a blue and yellow overlap, you will get a green section. Be conscious of the overlapped colors so you don't get some undesirable results. Personally, I hate brown so am careful to avoid that. Yellow + blue = green, red+green = brown, blue + red = purple.
How to tie dye with food coloring?
Food coloring can be used instead of commercial dyes on some fabrics such as polyester. Mix the food coloring with a small amount of water and pour it into an application bottle. Washing your fabric after dying with white vinegar will help set the dye. When food coloring is used on natural fabrics like cotton, it tends to give more subtle results. But if you like pastels, then this might work well for you!
How to tie dye with bleach?
Tie dying with bleach is also referred to as reverse dying. If you have a dark-colored fabric you can tie dye with bleach instead of a color. This means that the areas under the bands will stay the original color and the rest of the fabric will be bleached. Take precautions and always wear gloves and use bleach in a well-ventilated area. This technique looks amazing on denim jeans!
How to tie dye socks?
Socks can be tie dyed using any of the methods above. The main thing to keep in mind is that as they are smaller items, you will need to cut down on the number of bands you use. Tie the socks together if you want them to match. The scrunching method is one of the easiest for socks. Socks sometimes have elastane to make them stretch but this may stop the dye from penetrating. Check the label for the fiber content before you start.
How to tie dye a hoodie?
Tie dye hoodies are super trendy at the moment. Common methods are scrunched or rainbow designs. Carefully fold the hoodie in half along the center zipper if you want the 2 sides to match. Otherwise do a freestyle design using a simple scrunching method. Make sure your hoodie is 100% cotton for the best results. If you find a matching pair of sweatpants you can have a whole set!
How to tie dye sneakers
Cotton or canvas sneakers love to be tie dyed! Decide whether you want the laces to be included in your dye bath and remove them if not. Instead of using rubber bands or tying, sneakers can be tie dyed by using applicator bottles and dripping dye in strategic places. Brushes or cotton buds can also be used to drip dye and make a unique pair of shoes.
How to remove dye?
If you have accidentally got dye on your clothing then the only solution is to use a commercial stain or dye remover. Hands can be rubbed with soap and water but may take a few days to fade completely.
Should I rinse tie-dye in hot or cold water?
You should always rinse dye in cold water to prevent excess removal of the dye. In addition, hot water tends to shrink cotton fabrics so you may end up with a shirt that is too small.
How to Tie Dye - In Conclusion
So learn how to tie and dye to take yourself back to an era when it was 'hippy' to be free-spirited and dress 'happy' in tie dye. The individual look of the 60's that has made a return to the catwalks over and over again in the years since.
More Fabric Techniques
- Fabric Painting
- How to Stiffen Fabric for Craft
- Fabric Manipulation
- How to Sew Sequins
- How to Attach Rhinestones
More Tie Dye Articles
- How to Tie Dye for Beginners
- How to Bleach Tie Dye
- How to Tie Dye Socks
- How to Tie Dye a Hoodie or Sweatshirt
- Tie Dye Patterns


-
Rubber Bands
-
Rubber Gloves
-
Plastic Bags
-
Metal Baking Tray
- Fabric to Dye White 100% cotton is best
- Fabric Dye Commercial dyes made for tie-dye are best. Look for one step dyes that come with applicator bottles.
-
Pre-wash your fabric and leave it damp.
-
Mix the dye with water according to the manufacturer's instructions. One-step dyes generally just need water added to the applicator bottles.
-
Tie the fabric with the rubber bands. Different designs can be achieved with different tying techniques.

-
Put the tied fabric on a baking tray over a sink or large container that will catch the dye. Using the applicator bottles, squeeze dye in your desired areas.

-
Place the item in a plastic bag for 6-8 hours.
-
Remove from the bag and rinse in cold water until clear.
-
Cut the rubber bands, hang to dry.

See the full tutorial at https://blog.treasurie.com/how-to-tie-dye/
Source: https://blog.treasurie.com/how-to-tie-dye/
0 Response to "How to Make an Easy Tie Dye Shirt"
Post a Comment